Optimization is a core process in optical system design. It allows designers to improve image quality by systematically adjusting lens parameters to meet defined performance goals.
In Zemax OpticStudio, optimization is driven by:
- Variables (parameters the software is allowed to change)
- A Merit Function (a mathematical description of the design goals)
This article introduces the basic concepts of optimization, explains how to set parameters as variables, and demonstrates how to construct and use a default Merit Function.
Understanding Degrees of Freedom
Before running any optimization, it is essential to understand how much freedom the design has.
Even though a single lens (singlet) has fundamental performance limits, OpticStudio can often find a solution that performs better than an initial manual design.
The key question to ask is:
How many degrees of freedom does this design have?
In practical terms, this means:
- How many radii of curvature
- How many thicknesses
- How many air spaces
- How many material choices
are allowed to vary.
Only parameters marked as variables can be adjusted during optimization.
Setting Variables in the Lens Data Editor
After defining the basic system layout:
- Open the Lens Data Editor (LDE)
- Identify parameters you want the optimizer to adjust
- Set those parameters as Variables
Typical variables include:
- Lens radii
- Element thicknesses
- Air gaps
- Sometimes conic constants or aspheric terms
Good practice:
- Start with a small number of variables
- Increase complexity gradually
- Avoid over-constraining or over-freeing the system too early

Constructing the Default Merit Function
Once variables are defined, the next step is to build a Merit Function, which tells OpticStudio what “good performance” means.
Although it is possible to build a Merit Function manually, the easiest and most robust approach—especially for beginners—is to use the Optimization Wizard.
- Open the Merit Function Editor (MFE)
- Select Wizards and Operands → Optimization Wizard
- The Optimization Wizard dialog will appear
- Choose the desired image quality criteria
- Leave other settings at their default values (for learning or initial design)
- Click OK
OpticStudio will automatically generate a default Merit Function tailored to your system.
This default function typically includes:
- Spot size or wavefront error terms
- Field weighting
- Wavelength weighting
- Basic constraints to guide convergence

Upon selecting this option, the Optimization Wizard dialog will appear, from which various options may be selected for defining a default Merit Function. All other parameters may be left as default for the purposes of this exercise.

Performing the Optimization
With variables set and a Merit Function defined, you can now run the optimization.

During optimization:
OpticStudio iteratively adjusts the variable parameters
The goal is to reduce the Merit Function value
A lower Merit Function value indicates:
Better image quality
Closer agreement with the defined goals
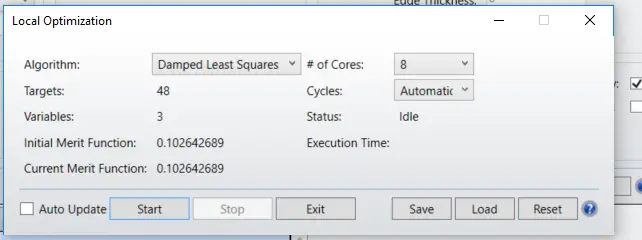
To start optimization:
- Open the Optimize dialog
- Run Damped Least Squares (DLS) optimization
- Observe how the Merit Function value decreases.

Once satisfied, click Exit to stop optimization and close the dialog
Recommended Optimization Workflow
Best practice when designing optical systems in OpticStudio:
Define system settings first
Aperture
Wavelengths
Field definition
(via the System Explorer)
Enter the basic geometry
Lens Data Editor
Set appropriate variables
Generate a default Merit Function
Run optimization
Refine variables and constraints as needed
This structured approach improves convergence and avoids unstable or unrealistic solutions.
Key Takeaways
- Optimization depends on variables + Merit Function
- Understand degrees of freedom before optimizing
- Use the Optimization Wizard for fast, reliable setup
- Start simple, then add complexity
- A lower Merit Function value means better performance
Optimization is not about replacing optical insight—it is a tool that amplifies good design decisions.